Showing posts with label and. Show all posts
Showing posts with label and. Show all posts
Thursday, November 21, 2013
Resetter Epson TX100 and Epson TX105
Require working resetter for Epson TX100 and TX105 please download this adjustment program. Like my previous software resetter epson TX series to run this software without error don’t click AdjProg.exe directly. You can run this adjustment Epson TX100 and TX105 software by clicking loader exe.
Epson Stylus TX100 and TX105 is a multifunction printer designed to deliver high quality results for all your printing, photocopying and scanning. This epson printer can print up to 5760 dpi with Variable-Sized Droplet Technology and it having print speed 26 ppm for black text and 14 ppm for color text on A4 paper size.
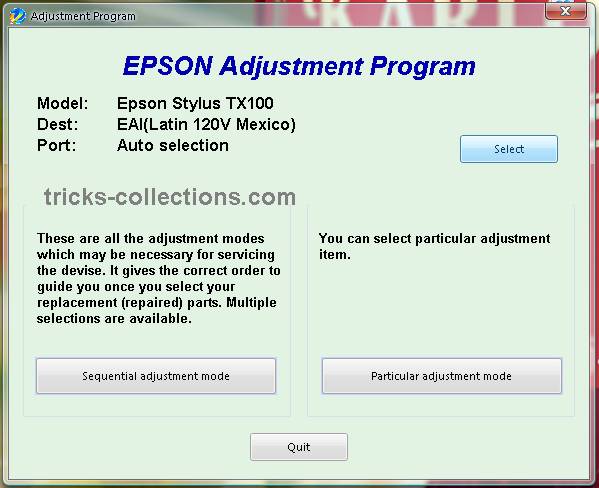
How to reset counter epson TX100 or Epson TX105 with this software.
Update: New download link in mediafire : http://www.mediafire.com/file/mzezmztzmkg/TX100-TX105.rar
note: no warranty all problem caused by this software on printer. Use this software as your own risk
Epson Stylus TX100 and TX105 is a multifunction printer designed to deliver high quality results for all your printing, photocopying and scanning. This epson printer can print up to 5760 dpi with Variable-Sized Droplet Technology and it having print speed 26 ppm for black text and 14 ppm for color text on A4 paper size.
How to reset counter epson TX100 or Epson TX105 with this software.
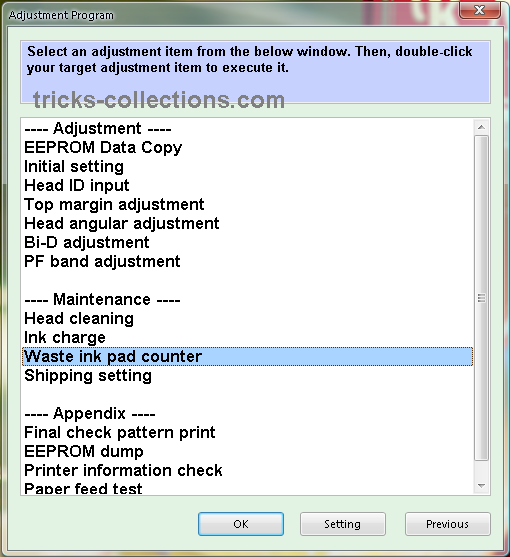
- Run the software (Adjustment TX100 and TX105 no instalation require). Then click accept button. Click select button to seledt your printers type. Available two coiche. Epson TX100 or Epson TX105, Ok. Click paticular adjustment mode.
- Click waste ink pad counter from maintenance menu, OK.
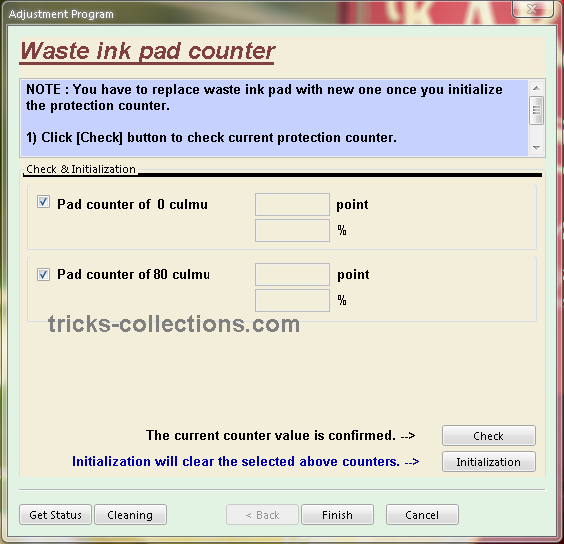
- Click check to view status counter of your printers. Click initialization to reset the counter.
Update: New download link in mediafire : http://www.mediafire.com/file/mzezmztzmkg/TX100-TX105.rar
note: no warranty all problem caused by this software on printer. Use this software as your own risk

Tuesday, November 19, 2013
How to Reset Waste Ink Tank Canon MP390 and Canon MP360
 Canon MultiPass MP390 Multifunction Review
The Canon MP390 is a great multifunction printer for small homes. For most homes and small businesses, space is a consideration when buying office machines, which is exactly why multifunctions like the MultiPass MP390 from Canon are such a popular choice. By combining printing, copying, scanning, and fax functions into one convenient unit, you can save on valuable desktop space, while taking advantage of all the functionality normally provided by four separate peripherals. The MP390 can also print high-quality color photos directly from compatible cameras and memory cards.
Canon MultiPASS MP360 is All-in-One (Printer - Copier - Scanner) multifunction Inkjet printer, designed for home and small office.
Manual Reset procedure Waste Ink Tank for Canon MP390 and Canon MP360 Just Follow this step to reset waste ink tank full:
- Start with printer on, press aadditional functions, Scan, Copy, Scan. Now you should be in service mode.
- Select Test mode which is like the last available selection
- Select #8 Printer Test, it will do something here like cleaning or something then it will come up with some other option this is where it gets a bit confusing cause now all it says is like 8-2 or 8-3 push the + or - button until it says 8-3 then hit the select button
- The menu will now say EEPRsaya Clear
- Select Ink count which is option (0) and press set
- Then press Reset Followed by the power button and then wait for it to restart.
Sunday, November 17, 2013
Reset Epson T50 and T60 Without Error 21000068
Get an error 21000068 when resetting your Epson T50 or T60 and not see any solution to prevent the problem. Why not try this tip. But this method not recommended for beginner user and you must understand what you are doing.
Here the reset method Epson T50 and T60 without error 21000068 :
Here the reset method Epson T50 and T60 without error 21000068 :
- Turn off printer and open printer.
- Open your Epson main PCB board. You can view an 8 pin CMOS IC. That is Epson waste ink counter IC and found on all Epson Printer.

- You can reset your printer without any resetter by following these ways.
- Soldering pin no 1,2,3,4 by wire as show in PICTURE and now turn on printer for ”20 second”

- After 20 second turn off printer and remove soldering wire from pin no. 1,2,3,4 ( back in original condition)
- Now turn on your printer
- And now your printer will be RESET
Note : This method is not recommended for beginners so you have to understand what you are doing. All problem caused by this tutorials is not our responsibility. Use this tutorial as your own risk.


Thursday, November 14, 2013
Epson Resetter T10 and TX100
I get this download link info software resetter T10 and TX100 from this blog reader but this adjustment program TX100 and T10 is trial version. All features of this software doesn’t not work but many this blog request this software. I hope one of the reader can make this software work 100%. If you interested to try this software you can download this from the link below.
When I try this software on my computer, this software does not respond when I click “particular adjustment mode” or “sequintal adjustment mode”. Here the screen-shot of the adjustment program T10 and TX100.


This adjustment does not work, dont waste your time to download this software if wont working software.
When I try this software on my computer, this software does not respond when I click “particular adjustment mode” or “sequintal adjustment mode”. Here the screen-shot of the adjustment program T10 and TX100.
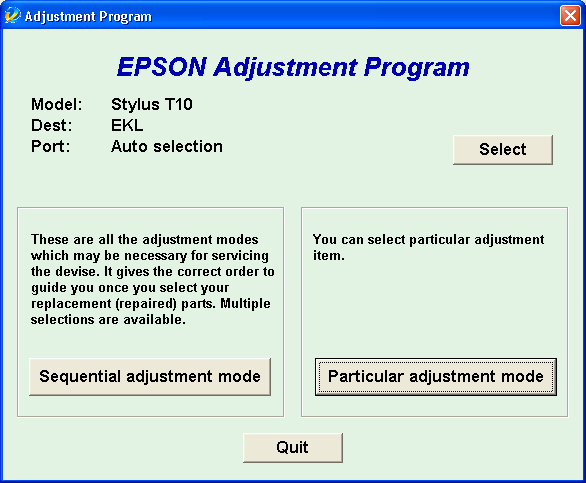

This adjustment does not work, dont waste your time to download this software if wont working software.
- Download link adjustment epson tx100 –> http://www.mediafire.com/file/2dzmkwkjjoa/TX100.zip
- Download link Adjustment epson t10 –> http://www.mediafire.com/file/neuqgzzmxln/T10.zip
- Download Adjustment Program Epson T10
- Download Adjustment Program Epson TX100
Sunday, November 10, 2013
Resetter Epson Stylus Photo R220 and R230
Before run adjustment program or software resetter Epson Stylus Photo R220 and R230, set date setting in your computer to 12 January 2006. Appearance of adjustment program Epson stylus photo R220 and R230 like adjustment program for Epson C45. Your Epson Stylus Photo R220 and R230 must be installed correctly in your computer before using the software otherwise so this software resetter will not be used.
Epson R220 and R230 using 6 Individual Intellidge Colour Ink Cartridges and this printer designed for photo printing. This printer has a very high resolution up to 5760 x 1440 dpi and allows photo quality printing. It has parallel and USB interface to connected to computer and its compatible with Windows 98, Windows 2000, ME Windows XP and Macintosh.
 Here how to Reset Epson R220 and R230 using the software
Updated
If this software not work, you can also use SSC software to reset printer Epson R220 and Epson R230. the newest version of SSC software (SSC ver 3.40) support for this printers.
Epson R220 and R230 using 6 Individual Intellidge Colour Ink Cartridges and this printer designed for photo printing. This printer has a very high resolution up to 5760 x 1440 dpi and allows photo quality printing. It has parallel and USB interface to connected to computer and its compatible with Windows 98, Windows 2000, ME Windows XP and Macintosh.

- Download and extract downloaded software and run it.
- Click accept button.
- Set model name, port selection and destination setting and equal to your printer.
- Click Maintenance Tab.
- Check mark waste ink pad counter.
- And the clear the protection counter (reset counter to zero)
- Then click Ok, Ok
- done
Updated
If this software not work, you can also use SSC software to reset printer Epson R220 and Epson R230. the newest version of SSC software (SSC ver 3.40) support for this printers.
Sunday, October 6, 2013
How to Reset Waste Ink Counter Canon Pixma iX5000 and iX4000
To reset counter Canon PIXMA iX4000 or iX5000 you have to enter to service mode. Procedure to enter to service mode on Canon PIXMA iX4000 or iX5000 is as following :
Read more...
- Connect the Canon PIXMA iX5000 or iX4000 printer to the power cord. ( note : If the automatic power-on function is enabled in the printer, the printer enters the service mode for the first time, but it will never enter the service mode if the printer is turned off by the Power button. This is because the printer remains to be turned on internally if the power is turned off by the Power button. To prevent this, disconnection of the power cord is required before starting the printer in the service mode ) .
- With the Canon PIXMA iX5000 or iX4000 printer powered off, while pressing the Resume/Cancel button, press and hold the Power button. (note : Don’t release the buttons. The Power LED lights in green to indicate that a function is selectable.)
- While holding the Power button, release Resume/Cancel button. (Don’t release the Power button.)
- While holding the Power button, press Resume/Cancel button 2 times, and then release both the Power and Resume/Cancel buttons.
- When the Power LED lights in green, press the Resume/Cancel button 4 times to reset waste ink counter in the Canon Pixma iX5000 / iX4000. (note : If the Power LED does not light in green the printer does not enter the service mode, disconnect the power cord and plug it again. Then start from step 1 to start the printer in the service mode again).
- At the end of the service mode, press the Power button. The paper lifting plate of the sheet feed unit will be raised.
- Each time the Resume/Cancel button is pressed, the Alarm and Power LEDs light alternately, Alarm in orange and Power in green, starting with Alarm LED.
Thursday, September 26, 2013
Resetter Code for Canon BJ F900

1. Turn off the printer.
2. Press and hold the RESUME button, then press and hold the POWER button.
3. Release the RESUME button, then press and release the RESUME button two more times in succession. (youre still holding the POWER button during this). The printer mechanics will move momentarily.
4. You are now in Service mode.
5. Pressing the RESUME key will select a function; for example, pressing RESUME 4 times will select the clear waste ink counter function. The lamp will alternate color with each key press.
(a). service/factory test printout, including ink sensor check
(b). EEPROM info printout
(c). EEPROM initialization
(d). Clear the waste-ink counter
(e). Printer model setting. (more selections beyond this- leave this alone)
6. After selecting mode, press the POWER button to commit the change, and return to the top of the function selection menu. Pressing the POWER button again turns off the printer for a resta
The Secret Resetter Code for Canon BJ-30 BJC-35v BJC-70
F14 Error Reset
1. Unplug adapter
2. Hold POWER
3. Plug in ADAPTER
4. Release POWER after printer starts
5. Hold FF and MENU and press POWER
6. Release after beeps
7. Press <> Cartridge until 1A is displayed
8. Press ONLINE
9. Press POWER to shutoff printer
10. Unplug printer then re-plug printer
Wednesday, March 6, 2013
Epson R230 printer repair and printer Close To Open
Epson R230 printer cover is not as easy as opening other types of printers such as Epson C79, C90 C58, C45, T11, T20 and the Epson Stylus C45. On this occasion, if we want to fix the printer a lot of steps should we consider when disassembling the printer, because so many key baud and installed by the manufacturer, perhaps because of the size of the printer that is larger than previous versions and to strengthen the body of the printer own. Here are the steps to open the Epson R230 printer:
First prepared with tools such as:
1. Plus size screwdriver (+)
2. Small-sized screwdriver min (-)
3. Baud storage (so that not all baud when unpacking splattered everywhere)
After setting up tools on top of us straight to the point of dismantling the Epson R230:
1. Open the back of the printer baud 3 baud here there has to be opened, note the picture below

2. Open the printer cover left and right side by prying the retaining cap bottom first, and proceed to the back side, and so on the inside. note the picture below:


3. in the second part is not done in a hurry, do it with a heart-to-day and look carefully the parts of a binding cap printer, this process applies exactly the same
4. as opening the lid next to it.

5. At this stage we can do many things, such as:
Read more...
First prepared with tools such as:
1. Plus size screwdriver (+)
2. Small-sized screwdriver min (-)
3. Baud storage (so that not all baud when unpacking splattered everywhere)
After setting up tools on top of us straight to the point of dismantling the Epson R230:
1. Open the back of the printer baud 3 baud here there has to be opened, note the picture below
2. Open the printer cover left and right side by prying the retaining cap bottom first, and proceed to the back side, and so on the inside. note the picture below:


3. in the second part is not done in a hurry, do it with a heart-to-day and look carefully the parts of a binding cap printer, this process applies exactly the same
4. as opening the lid next to it.

5. At this stage we can do many things, such as:
- clean the inside of the printer
- replace rubber puller roll paper
- etc.
Subscribe to:
Posts (Atom)